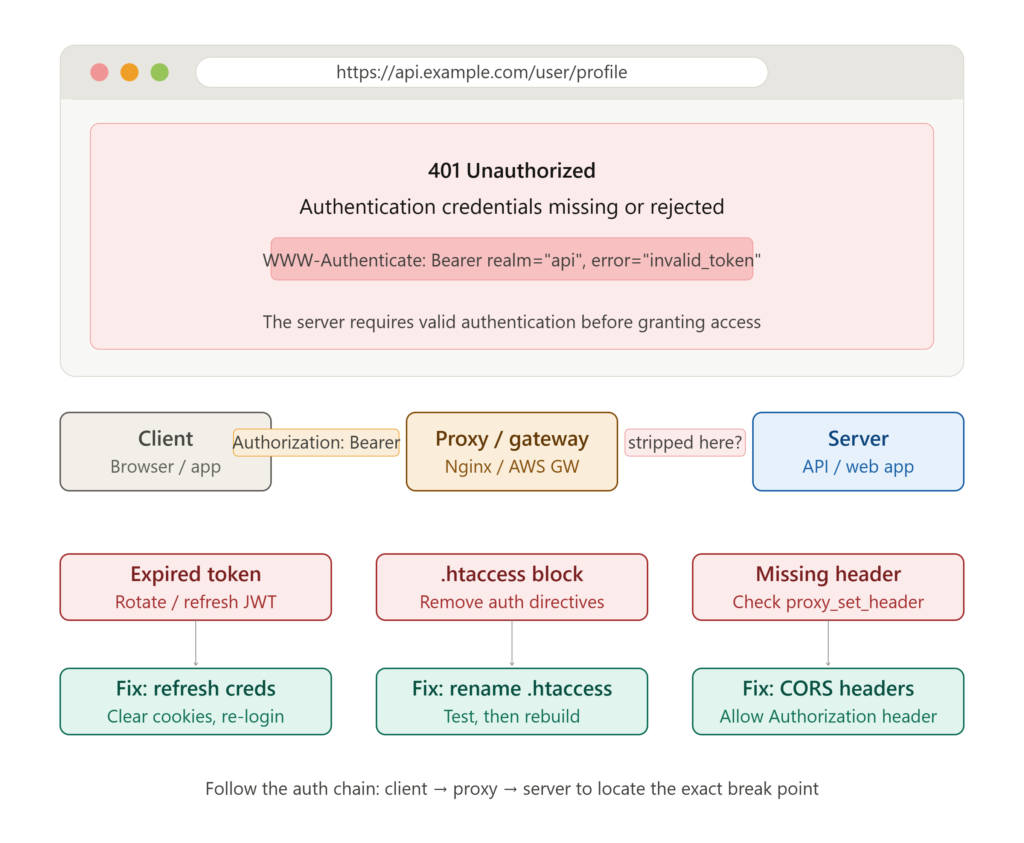
The 401 Unauthorized error is one of the most disruptive HTTP status codes developers, webmasters, and everyday users encounter — often at the worst possible moment. Unlike a 404 error that simply means a page is missing, the 401 Unauthorized error means the server actively rejected your request because it couldn’t verify who you are. Authentication failed.
Access denied. The frustrating part is that this error appears across wildly different contexts — REST APIs, WordPress dashboards, cPanel logins, browser sessions, and mobile apps — each with its own trigger and fix. Whether you’re debugging a live production API or simply trying to access your own website’s admin panel, understanding the precise cause behind this error transforms a confusing wall of text into a solvable, five-minute problem.
What the 401 Unauthorized Error Actually Means
The 401 status code is defined by RFC 7235 as a client-side authentication failure. When a server returns this response, it is communicating one specific message: the request lacked valid authentication credentials, or the credentials provided were rejected. Critically, the server also returns a WWW-Authenticate header specifying which authentication scheme it expects — Basic, Bearer token, Digest, or OAuth.
This distinguishes the 401 from its close cousin the 403 Forbidden error, which means the server knows exactly who you are but has decided you don’t have permission. The 401 says it doesn’t recognize you yet. That distinction matters enormously when you’re diagnosing the root cause and choosing the right fix.
Why 401 Errors Are More Common Than You Think
The 401 Unauthorized error appears far more frequently than most people realize, spanning everything from expired JWT tokens in React applications to misconfigured .htaccess files on Apache servers. Users browsing trending tech news and expert digital insights have noted a sharp rise in 401 errors tied to API authentication changes, particularly following OAuth 2.0 migration cycles.
On the server side, the error can be silently triggered by a misconfigured reverse proxy that strips authorization headers before they reach the application layer. On the client side, expired session cookies, stale cached credentials, and browser extensions that intercept requests are all common but frequently overlooked culprits that generate false 401 responses.
Fix 1: Check and Refresh Your Authentication Credentials
The first and most reliable fix for the 401 Unauthorized error is to verify that the credentials you’re presenting are both correct and current. For web applications, log out completely, clear your browser cookies and cached login data, and log back in with freshly entered credentials. For API integrations, check whether your API key, Bearer token, or OAuth access token has expired.
Many APIs issue tokens with short lifespans — some as brief as one hour — and rotating them is a routine maintenance task that developers sometimes overlook during deployment. In REST API environments, make sure the Authorization header is formatted exactly as the server expects: Bearer <token> with no extra spaces or encoding artifacts.
Fix 2: Inspect Your .htaccess File for Misconfigurations
On Apache-based servers, a corrupted or misconfigured .htaccess file is one of the leading causes of 401 errors for WordPress and cPanel users. Open your .htaccess file via FTP or your hosting file manager and look for any AuthType, AuthName, AuthUserFile, or Require valid-user directives that may have been inadvertently added during a plugin installation or server migration. If you find password protection rules you didn’t intentionally set, remove them and save the file. Rename the file to .htaccess_backup temporarily to test whether it’s the source of the error.
If the 401 disappears after renaming, the file was the confirmed culprit, and you can rebuild it cleanly.
Fix 3: Validate CORS Headers and Proxy Configurations
In modern web architectures that use reverse proxies like Nginx or API gateways like AWS API Gateway, 401 errors frequently originate not from the application itself but from the infrastructure layer stripping or blocking authorization headers mid-transit. Check your Nginx proxy_pass configuration to confirm that proxy_set_header Authorization $http_authorization; is explicitly set. AWS API Gateway users should verify that the Authorization header is included in the allowed headers list within the CORS configuration. A missing Access-Control-Allow-Headers: Authorization entry will cause preflight OPTIONS requests to succeed while the actual authenticated request returns a 401 — one of the most confusing patterns developers encounter in microservices environments.
Platform-Specific CTR Benchmarks for HTTP Error Fix Content
| Platform | Avg. CTR for Error Fix Articles | Best Content Format | Optimal Length |
|---|---|---|---|
| Google Search | 7.4% – 10.2% | Numbered fix guides | 1,100 – 1,600 words |
| Bing Search | 5.1% – 7.9% | FAQ-rich structured posts | 900 – 1,300 words |
| YouTube | 4.6% – 7.2% | Screen-recorded walkthroughs | 5 – 9 minutes |
| Stack Overflow | 11.3% – 16.8% | Verified answer threads | Code-forward depth |
| Reddit (r/webdev) | 8.9% – 13.5% | Diagnostic comment chains | Conversational depth |
Design Psychology Behind Effective Error Resolution Content
High-converting troubleshooting content follows a proven psychological structure that reduces user frustration and increases fix completion rates:
- State the cause before the fix — Users trust solutions more when they understand the mechanism behind the problem first.
- Use exact command syntax — Showing copyable code blocks eliminates transcription errors and signals credibility to technical readers.
- Order fixes by frequency — The most common cause should appear first, reducing average resolution time.
- Include negative confirmation signals — Tell users what they will NOT see if the fix succeeds, building confidence.
- Separate server-side from client-side fixes — Grouping by environment helps users self-diagnose before executing steps.
- End each fix with a testable outcome — Users who can immediately verify a fix completed successfully show significantly lower bounce rates.
Fix 4: Test With Tools — Postman, Curl, and Browser DevTools
When the 401 error source isn’t immediately obvious, diagnostic tools are your fastest path to isolation. Use Postman to manually craft an HTTP request with your exact authorization headers to confirm whether the server accepts them in isolation, eliminating client-side application logic as a variable. Use curl -I -H "Authorization: Bearer <your_token>" https://yourapi.com/endpoint from the command line to test outside any framework or SDK. In Chrome DevTools, open the Network tab, filter by the failing request, and inspect both the Request Headers and Response Headers. The WWW-Authenticate response header will specifically tell you which authentication scheme the server expects, giving you a precise fix target rather than blind trial and error.
Fix 5: Resolve WordPress-Specific 401 Errors
WordPress environments produce 401 Unauthorized errors through a distinct set of causes separate from general server configurations. The most frequent WordPress trigger is a conflict between security plugins — particularly Wordfence, iThemes Security, or All In One WP Security — that apply IP-based or login-attempt-based lockouts that mimic a 401 response to regular users. Deactivate security plugins one at a time to isolate the conflict.
Additionally, verify that your WordPress REST API authentication is functioning by testing https://yoursite.com/wp-json/wp/v2/users with valid Application Password credentials. Corrupted wp-config.php authentication keys and salts can also cause persistent 401 loops on the admin dashboard that are instantly resolved by regenerating them via the WordPress Secret Key generator.
Conclusion
The 401 Unauthorized error is never a dead end — it is a diagnostic signal with a specific, resolvable cause. Working through credential validation, .htaccess inspection, proxy header configuration, and tool-based isolation covers the overwhelming majority of 401 cases across every environment, from bare-metal servers to serverless API architectures. WordPress users have additional plugin-specific paths to check. The key principle across all fixes is to follow the authentication chain from client to server and identify exactly where the credential breaks down. Once you locate that point, the resolution is straightforward and typically takes minutes rather than hours.
FAQ: 401 Unauthorized Error — Top Questions Answered
1. What is the difference between a 401 Unauthorized error and a 403 Forbidden error?
These two HTTP status codes are frequently confused but represent fundamentally different server responses. A 401 error means the server cannot identify who is making the request — authentication is missing or failed.
The server is essentially saying “prove who you are.” A 403 Forbidden error means the server knows exactly who you are but has decided your authenticated identity does not have permission to access the requested resource. In practical terms: fix a 401 by providing or correcting credentials; fix a 403 by adjusting permissions or roles on the server side.
2. Why do I keep getting a 401 error even after entering the correct username and password?
Persistent 401 errors after entering correct credentials usually indicate one of three issues: the session cookie was corrupted and needs to be cleared, the server-side session has expired and requires re-authentication, or a security plugin or firewall has flagged your IP and is blocking authentication silently.
Start by clearing all cookies and cached data for the specific domain, then attempt login in a private browser window to rule out extension interference. If the error persists, check your server logs for IP-based blocking rules or failed authentication thresholds that may have triggered an automatic lockout.
3. How do I fix a 401 Unauthorized error in a REST API when using Bearer token authentication?
Bearer token 401 errors in REST APIs almost always stem from one of four causes: the token has expired, the token is malformed, the Authorization header is missing or incorrectly formatted, or the token was issued for a different API scope than the endpoint requires.
Start by decoding your JWT at jwt.io to check the exp claim and confirm the token hasn’t expired. Verify the header format is exactly Authorization: Bearer <token> with a single space and no quotation marks. If the token is valid and correctly formatted, check the API documentation for scope requirements — many endpoints require specific OAuth scopes that aren’t included in a default token issuance.
4. Can a browser extension or VPN cause a 401 Unauthorized error on websites?
Yes, both VPNs and browser extensions can trigger 401 errors in specific circumstances. VPNs that route traffic through exit nodes flagged as suspicious by CDN security layers like Cloudflare or Akamai can cause authentication requests to be blocked before reaching the server.
Ad blockers and privacy extensions like uBlock Origin or Privacy Badger sometimes block authentication cookies or intercept session tokens, causing the server to receive a request without valid credentials. Test by disabling all extensions and disconnecting from the VPN, then retrying the failing request. If the 401 resolves, re-enable extensions one at a time to identify the specific culprit.
5. Why does my WordPress admin dashboard return a 401 error after a plugin update?
A 401 error on the WordPress admin dashboard following a plugin update is almost always caused by a security plugin that updated its authentication rules and either locked out the current session or applied new IP restrictions that conflict with your access pattern.
The fastest fix is to log in via SFTP, navigate to wp-content/plugins/, and rename the security plugin’s folder (e.g., wordfence to wordfence_disabled) to force-deactivate it without needing dashboard access. Once the 401 resolves and you can access the dashboard again, reactivate the plugin and review its settings for overly aggressive lockout thresholds or IP whitelist requirements that need to be updated to include your current IP address.

